Simplified Lighting
We offer the GnuckLite light controller and its Android app with LED tube rentals, as well as for permanent installations in performance venues where there is no lighting console or lighting technician on site.
Product Overview
GnuckLite est un contrôleur de lumières pour scène simplifié, compatible avec nos tubes LEDs en location ou pour installation permanente. C’est une invitation à la créativité sans contraintes techniques, pour découvrir une nouvelle dimension d’illumination facile et élégante pour vos soirées.
Key Features
Pure Simplicity
GnuckLite was created to eliminate the complexity associated with traditional lighting consoles. With a sleek and intuitive user interface, even those without prior experience can instantly bring a professional lighting look to their event.
Wireless Control via Android App
Connect to your GnuckLite through our user-friendly Android app. Customize colors, themes, animations, and even audio—all at your fingertips. GnuckLite creates its own wireless network and can also connect to a local WiFi network. Let your creativity shine without limits.
Flexible Music Sync: Built-in Microphone and RCA Input
For maximum convenience, GnuckLite is equipped with a built-in microphone for simplified audio synchronization. You can also connect your favorite audio sources via the RCA input for a lighting experience in harmony with the music. An audio-independent mode is also available!
Safety Over 512 Channels
With electrically isolated DMX outputs via optocoupling, GnuckLite’s DMX output allows you to safely control your devices across a full DMX universe of 512 channels. Create stunning lighting sequences that adapt to any space, from intimate bars to large events.

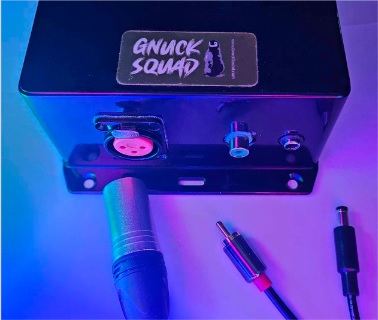
The GnuckLite Device
The GnuckLite device is capable of managing lights independently, with the app only used for configuration or live control. This means it can, for example, follow audio, randomly change animations and colors (whether according to a theme or not), without needing to be connected to the app. The device is equipped with an internal Wi-Fi antenna to create the access point that your Android phone or tablet connects to for configuring the lights via the GnuckLite app from several meters away. The device can also connect to a local WiFi network for greater range.
A built-in microphone is included if you don’t have an RCA output. The device has internal memory that will remember your settings even after a restart.
The box has two perforated edges to allow it to be mounted on a wall for a fixed installation.
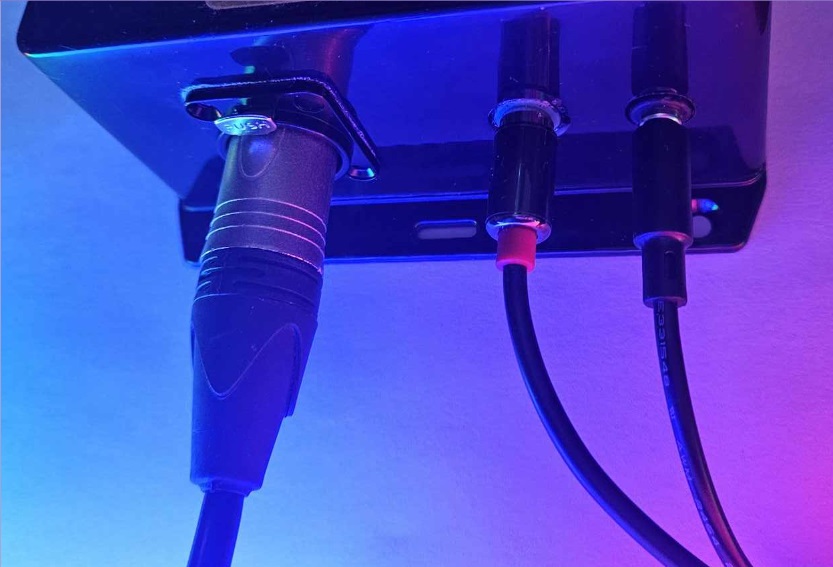
On the box, you will find three connectors:
DMX Output
Connect the DMX line to which your devices are connected.
RCA Input
Connect the L or R of your audio RCA cable here. Tip: You can plug it into the REC out of a mixer!
Power
Plug in the output of the wall adapter provided with your device
GnuckLite Application
The app provided with the device allows you to modify color settings, animations, audio responsiveness, and connected devices. It connects to the Wi-Fi network created by the GnuckLite device, protected by the password found in the app’s Help section.
The app is compatible with Android phones and tablets only. Windows and iOS are not supported.
Minimum Android Device Requirements: Android 7.0 (SDK 24), released in 2016.
User Manual
Connections
Plug the wall adapter into a 120V power source, then connect the other end to the 5V connector on the device.
Connect your DMX line to the 3-pin female connector on the device.
(Optional) Connect your audio output using an RCA cable, and plug one of the two sides (L or R) into the RCA input on the device. The REC output of a DJM can be used.
Using the GnuckLite App
Connecting to the Network
Connecting to the Access Point
Follow these steps if your Android device is not already set up to connect to the GnuckLite access point:
- Turn on Wi-Fi on your Android device.
- Connect to the GnuckLite AP network. The default password for your device is available in the Help section of the app.
- If using a dedicated device, you can enable automatic reconnection to the GnuckLite network.

Note: Your device's Internet functionality will be disabled while connected to the GnuckLite access point. To connect to an existing Wi-Fi network, refer to the "Connecting to a Wi-Fi Network" section.
Troubleshooting: If the device refuses to connect, ensure it is powered on and that you are close enough.
Connecting to a Wi-Fi Network
Follow these steps if a local Wi-Fi network is available and you wish to use it.
- Go to the “Settings” section.
- Click on “Wi-Fi Settings.”
- While connected to the GnuckLite access point, enter the SSID (network name) and password of your local Wi-Fi network. Click “OK.” The app will send the connection information to your GnuckLite device.
- Click “Wi-Fi Settings” again: the GnuckLite should have returned its IP address if you did not already know it. Click “OK” to save the IP address in the app.
- Connect your Android device to the local Wi-Fi network. You should now be able to control the GnuckLite device over the local Wi-Fi network.
Note: It is recommended to configure a static IP address for the GnuckLite in your router (it will appear as ESP32_…). You can now connect to your Wi-Fi network on your Android device for a better connection.
Lighting Control
The bottom bar of the app allows you to navigate between different sections: Colors, Animations, Audio, Settings, and About.
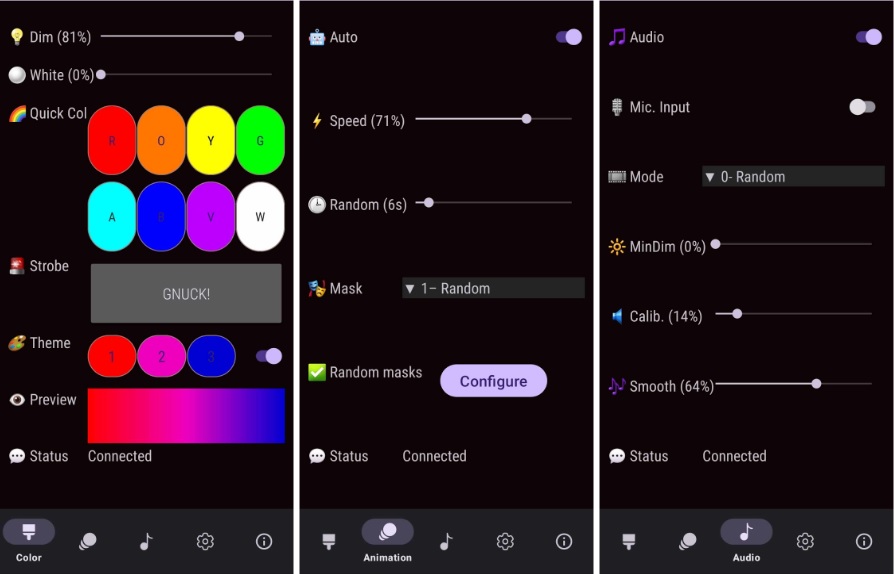
Colors
The Colors tab allows you to set color themes for your lights, change the color of all pixels, dim the light intensity, and activate the strobe mode of the lights.
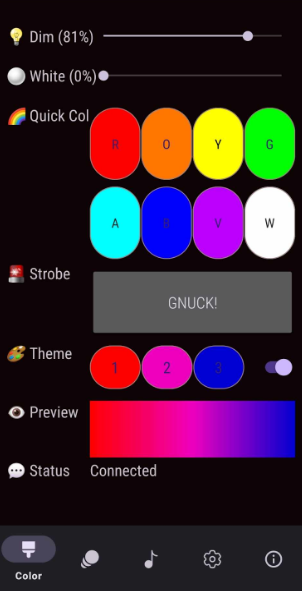
Dim: Slide the bar to the desired brightness. At 100%, the lights will shine at their maximum brightness. At 0%, the lights will be off.
Quick White : Slide the bar to the desired level of white. At 100%, the lights will shine in white at full intensity on the ‘white’ channel. The white level will automatically return to 0 if Auto mode is enabled.
Quick Col: Use the colored buttons to quickly set all your lights to the selected color. The lights will still change color automatically later if Auto mode is enabled.
Strobe : Press the strobe button to start making the lights flash. The lights will stop flashing when you release the strobe button.
Theme : Click on colored buttons 1, 2, and 3 to select the desired colors for your theme. A dialog box will appear, allowing you to choose the desired color. Click “OK” to apply the color.

ThemeOn Switch: Activating the theme color switch will restrict your lights to display colors close to your selection. Deselecting it will allow the lights to show random colors.
Preview: Preview the last selected color or a gradient based on your theme colors.
Status : Displays the connection status or the last value received by the device. Refer to 'Connecting to the Access Point' if the message ‘Please connect to the access point’ appears while setting a value.
Animations
The animations tab allows you to configure animations for your lights.
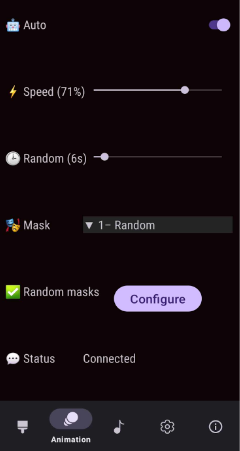
Auto : Choose whether you want the device to automatically manage animation changes or remain on the last selected value.
Speed : Allows you to control the speed of animations and color movements.
Random : Time in seconds between random changes in animations and colors. Note: “Auto” must be enabled to see random changes.
Mask: Allows you to define ‘masks’ that restrict certain lights or pixels from being lit. Default: 1-Random.
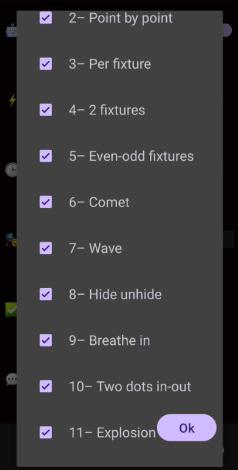
Random masks : Configure which masks can be displayed in random mask mode. The option 0-None is not displayed as it is always a possibility by default, though it appears less frequently.
Status : Displays the connection status or the last value received by the device. Refer to 'Connecting to the Access Point' if the message ‘Please connect to the access point’ appears while setting a value.
Audio
The audio tab allows you to configure the light’s responsiveness to sound.
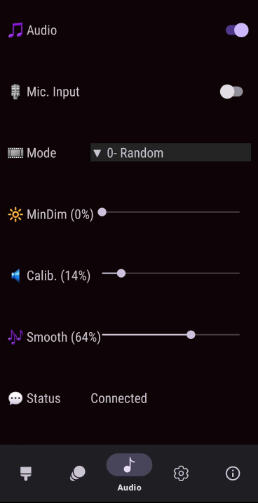
Audio : Enable or disable audio responsiveness.
Mic. Input : Check to receive audio from the microphone. Uncheck to receive audio from the RCA input.
Mode: Audio animation mode. Random: Selects randomly between sound modes if auto mode is enabled. Sound Dim: Adjusts the light intensity based on the sound level. Sound Bar: Extends a light bar from the center according to the audio level. Sound White: Adjusts the intensity and white level based on the audio mode. Default: 0-Random.
Min Dim: Minimum brightness level in audio mode. At 0%, the lights will be completely off when there is no sound. Default: 0%.
Calib. : Calibration of the minimum sound level for audio responsiveness. Move the slider to the desired audio calibration level. A good starting point is to increase the value until the lights do not turn on with normal background noise in the room (no music). Default: 10%.
Smooth : Audio smoothing (rolling average). Adjust the light’s responsiveness to sound. A higher smoothing value reduces flicker but may introduce a slight delay in sound responsiveness. Default: 55%.
Status : Displays the connection status or the last value received by the device. Refer to 'Connecting to the Access Point' if the message ‘Please connect to the access point’ appears while setting a value.
Settings
The settings tab allows you to configure DMX channels and audio settings.
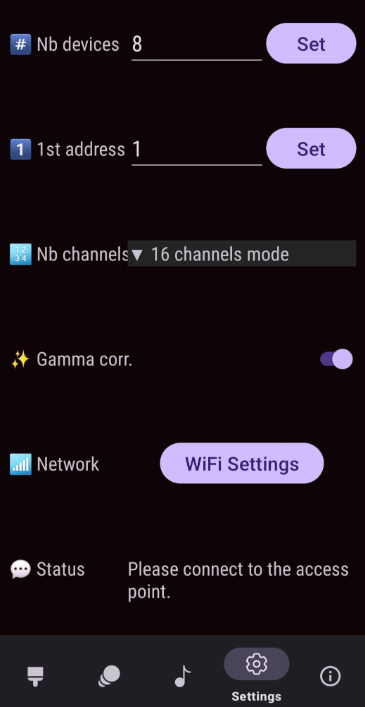
Nb devices : Allows you to change the number of devices with different addresses on the DMX line.
1st address : Allows you to change the address of the first device on the DMX line. It is assumed that all device addresses are contiguous. Default: 1.
Nb channels : DMX devices can be set to different channel modes, which changes the level of control over the pixels. Make sure this matches the channel mode (chn) on the light display.
Gamma corr. : Gamma correction adjusts RGB values to match human eye perception, resulting in more vibrant and less washed-out colors.
WiFi Settings: Allows you to configure the connection to a local WiFi network.
Status : Displays the connection status or the last value received by the device. Refer to 'Connecting to the Access Point' if the message ‘Please connect to the access point’ appears while setting a value.
About
In the "About" section, you will find the application version and contact information. Tap the buttons to view the End User License Agreement (EULA) and the Help section, available in both English and French.

App Installation
The GnuckLite app is not yet available on the Google Play Store. If your Android mobile device does not already have the GnuckLite app, please follow these instructions:
| Download the provided APK to your phone or tablet. | |
| Open the file. If Android prompts you to choose an app to open it, select Package Installer. | 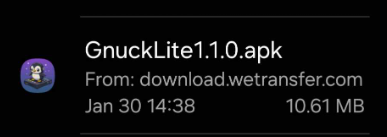 |
| You may need to grant permission to your web browser or file manager to install unknown apps. Tap Settings. |  |
| Check Allow permission to give your browser permission to install files from unknown sources. You can disable this permission after installation if desired. |  |
| Tap Install. | 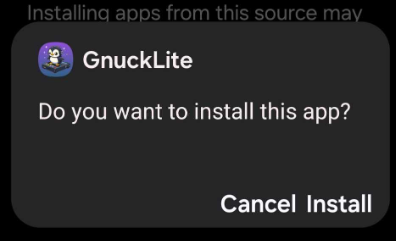 |
| Google Play Protect may block the installation of APKs from sources other than the Play Store. Tap More details, then Install anyway to proceed. |  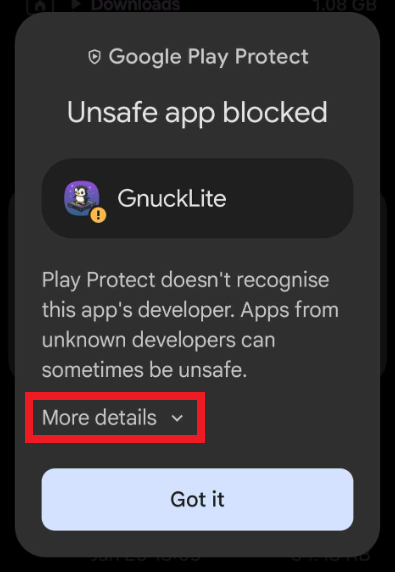 |
| Allow the installation to complete. | 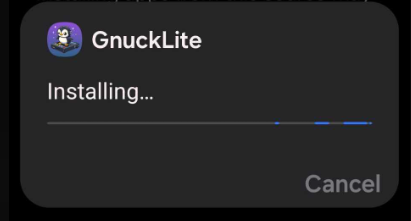 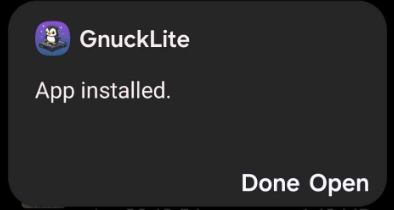 |
| Locate the GnuckLite app in your list of applications (swipe up). You can long-press the icon to add it to your home screen. |  |